FAQs
Please choose your topic.
The dimmer curve is obviously not set to “linear”. Please change the dimmer curve of all power outputs to “linear” at the DMX dimmer.
Check it by using a tungsten lamp at the power output of the LFXHub. Also note you should disable any pre-heat function.
The DMX channel assignment for a DC output is identical for all RC4 Magic 2.4 GHz, LumenRadio and W-DMX receivers according to the ONETOUCH procedure.
This procedure requires the dimmer, a transmitter (DMX tester or a DMX control desk) and a 5-pin DMX cable.
A bent paper clip is used to press the buttons behind the oval openings.
Transmitter and receiver must be coupled, the DMX signal must be present at the dimmer.
Procedure:
- Set the levels of all channels on the DMX transmitter to zero.
- Send the DMX channel on the DMX transmitter that is to be assigned to the first channel of the receiver (SetA).
- The level of this DMX channel determines the DMX address and the dimmer curve according to the table below.
- Using the paper clip on the receiver for channel “DIM A”, briefly press the “SET A” button behind the oval opening once.That’s it. If the assignment was successful, the LED (the monitor for channel DIM A) should now be on/dimmable by the DMX tester directly next to the oval opening..
| Dimmer curve, digital persistance | Level in % |
|---|---|
| Non-dim > ON/OFF OFF (no digital persistance) |
100% (80 – 100%) |
| linear (recommended for tungsten bulbs) OFF, (no digital persisrance) |
70% (60 – 79%) |
| ISL fast (recommended for LEDs), fast response needed OFF (no digital persistance) |
50% (40 – 59%) |
| ISL slow (recommended for ), smooth dimming default DP: Fast medium |
30% (20 – 39%) |
| Channel ignored No change of current settings |
< 20% |
NOTE: Set channel A first > channels B, C and D are then set automatically:
DMX channel B = DMX address A+1, C = DMX address A+2, D = DMX address A+3.
Assign any DMX address/dimmer curve for B, C and D by pressing “Set B” … as shown above. The previous channel assignments remains as it is.
Use a battery for the LFX Master DMX connected at DC input 1 or 2.
Recommended batteries: USB powerbank originally designed for smart phones, min. capacity 4200 mAhs recommended.
You may also drive all RC4 products with a battery from 5 – 32 VDC.
Change digital persistance for LEDs with ISL dimmer curve
The inertia simulation (digital persistance) can be changed for all RC4 wireless dimmers. This changes the response time of the LEDs when dimming.
This change makes sense when the optimal value for fast response in combination with soft dimming of LEDs is required.
Factory setting is “Medium”
A DMX signal must be present!
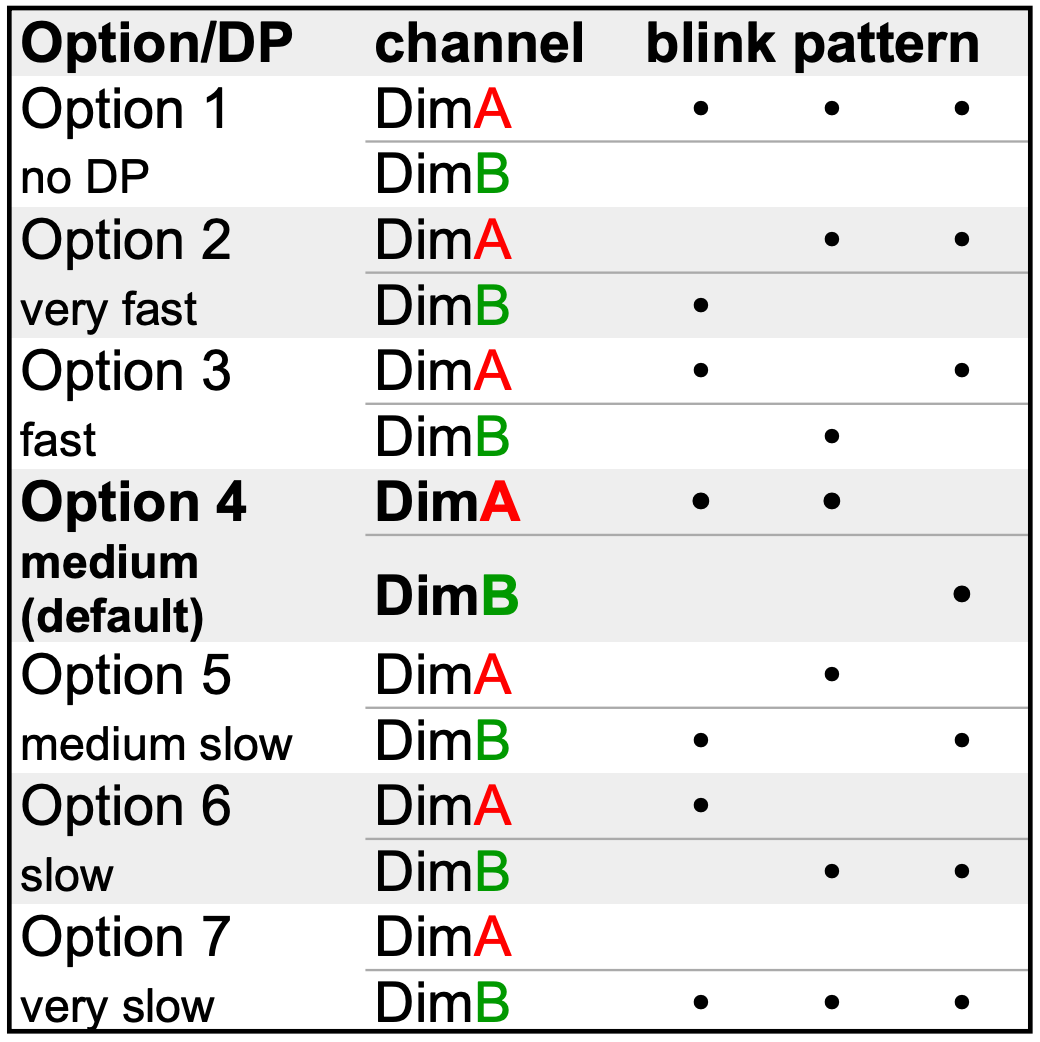
- Each long press of “SetC” (“OPTC” for LumendimM2) advances one option at a time. After option 7, option 1 is selected again.
- Feedback is given by the flashing pattern of the lamps connected to DimA and DimB, or of the output display LEDs.
- As soon as the flashing pattern appears, the “SetC” button can be released.
Video tutorial change digital persistanc by ONETOUCH
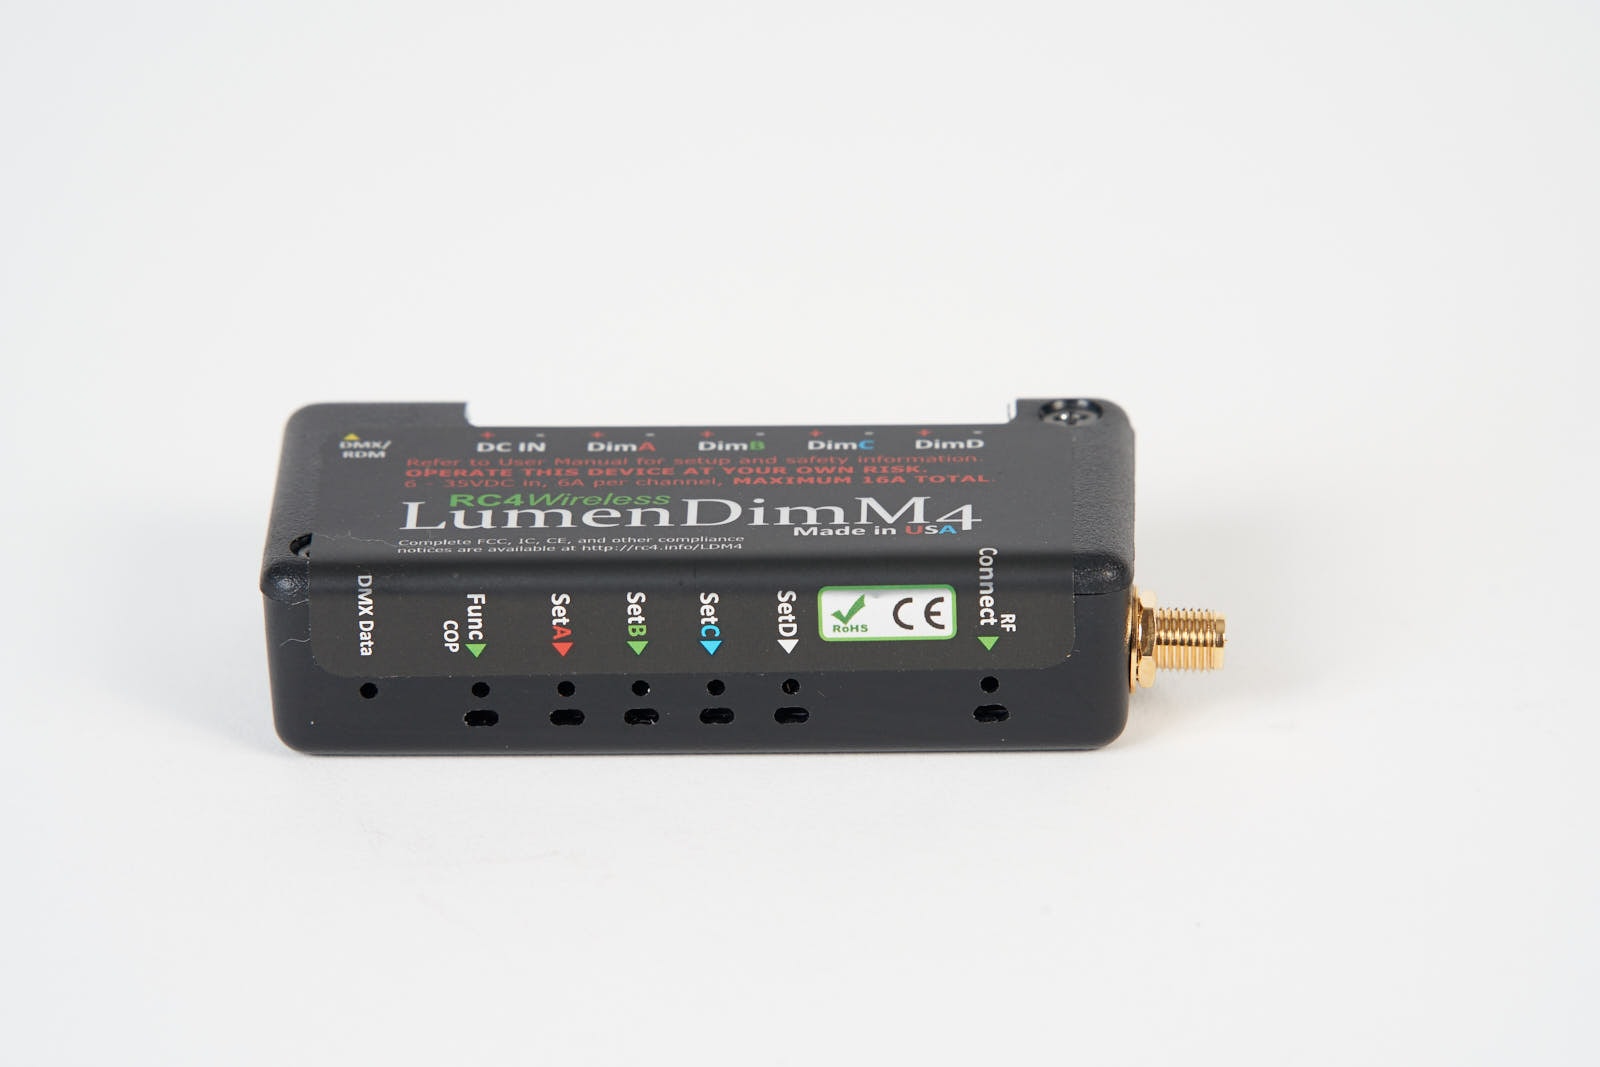
ONETOUCH-buttons, example with LumenDimM4
Several RC4 Magic systems can be used simultaneously at the same location.
For this purpose, different private IDs must be used.
There are four IDs available for each RC4 Magic 2.4 GHz gear: ID0, ID1, ID2, ID3 (public ID)
Change the ID on the receiver and transmitter DMXio/DMXio-HG (see label on the unit):
- Disconnect the dimmer/transmitter from the operating voltage
- Press and hold the “SetA”> ID0, “SetB” > ID1, “SetC” > ID2 or the public “SetD” >ID3 (public) key.
- Apply operating voltage > flashing indication of which ID is used directly after power-up: > ID0: LED “RFcon”; ID1: “COP”; ID2: “RFcon” and “COP” flash together, ID3 (public): “RFcon” and “COP” flash alternately > release key.
By default ID0 is selected if reset to factory settings is accomplished.
PWM Frequency selection is a Long-Press Button Feature, and the selected frequency is confirmed using patterns of two LEDs.
To cycle through available PWM frequencies:
Ensure live DMX data is streaming in by either wire (miniplug input) or wireless. If DMX data is not streaming, the Set buttons act as dimmer bump buttons only.
- Long-Press SetB
- When the LED blink pattern appears, release SetB.
- The next PWM frequency is now selected for all dimmers on the device and saved.
The LED blink pattern of DimA and DimB outputs indicates the frequency as outlined below. Each long-press of SetB advances to the next frequency. Advancing from the last option returns to the first option:
- Option 1: 615Hz (default): DimB > DimA > DimA
- Option 2: 1250Hz: DimA > DimB > DimA
- Option 3: 5kHz: DimB > DimB > DimA
- Option 4: 10kHz: DimA > DimA > DimB
- Option 5: 20kHz: DimB > DimA > DimB
- Option 6: 40kHz: DimA > DimB > DimB
Prefer a DMX-OUT device preset.
Custom config in the “expert mode”.
There are two ways of payment:
Credit card payment (Visa, Mastercard, American Express) or Paypal
Please see more details at the payment methods page.
No, look at the control panel. It´s self-explaining.
No.
It´s sophisticated user interface makes it easy even for beginners to create any type of lighting effects.
Have a look at the quick-start-guide.
Download firmware, software, USB driver for all RC4 dimmers here: https://rc4wireless.com/download/
These free-of-charge files are required for
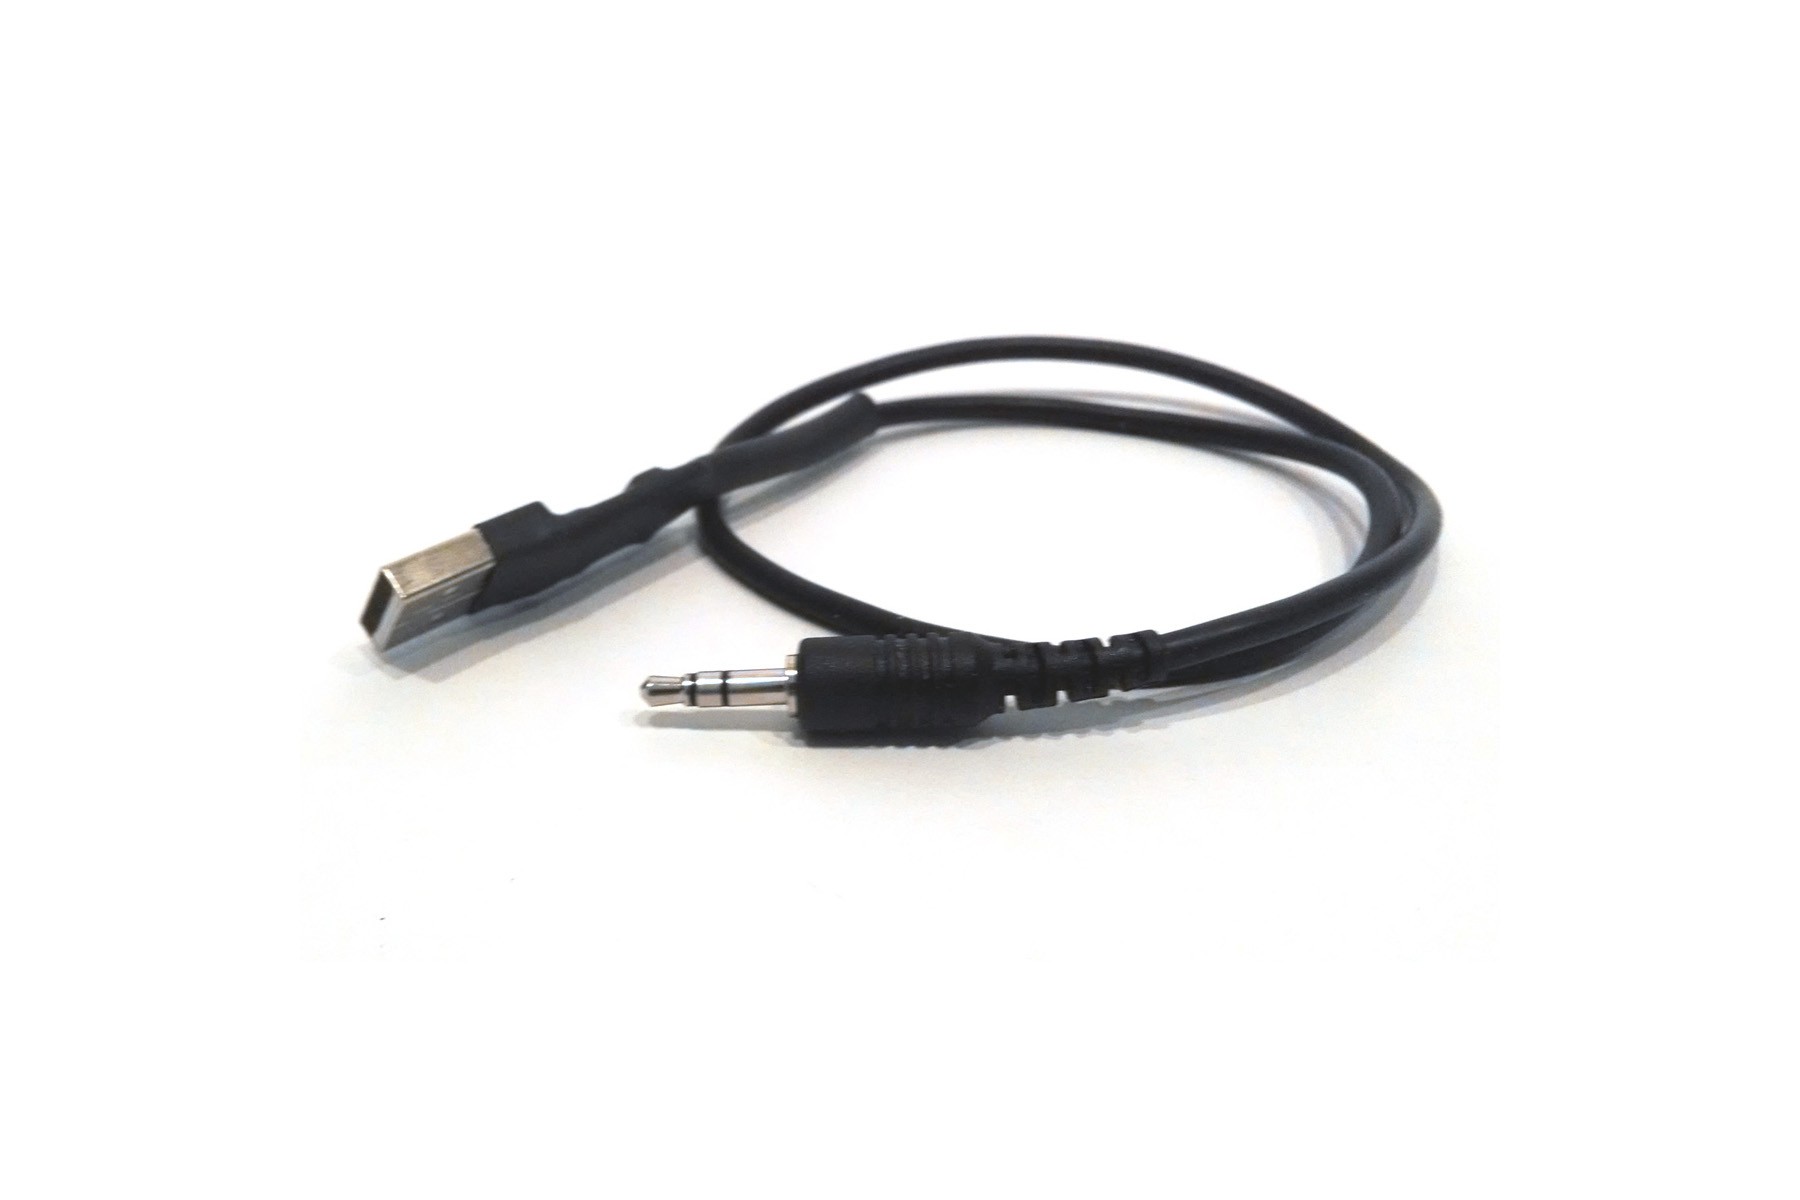
- CodeLoader cable (Update of dimmer firmware for more functions), if required please install the USB driver for the CodeLoader cable
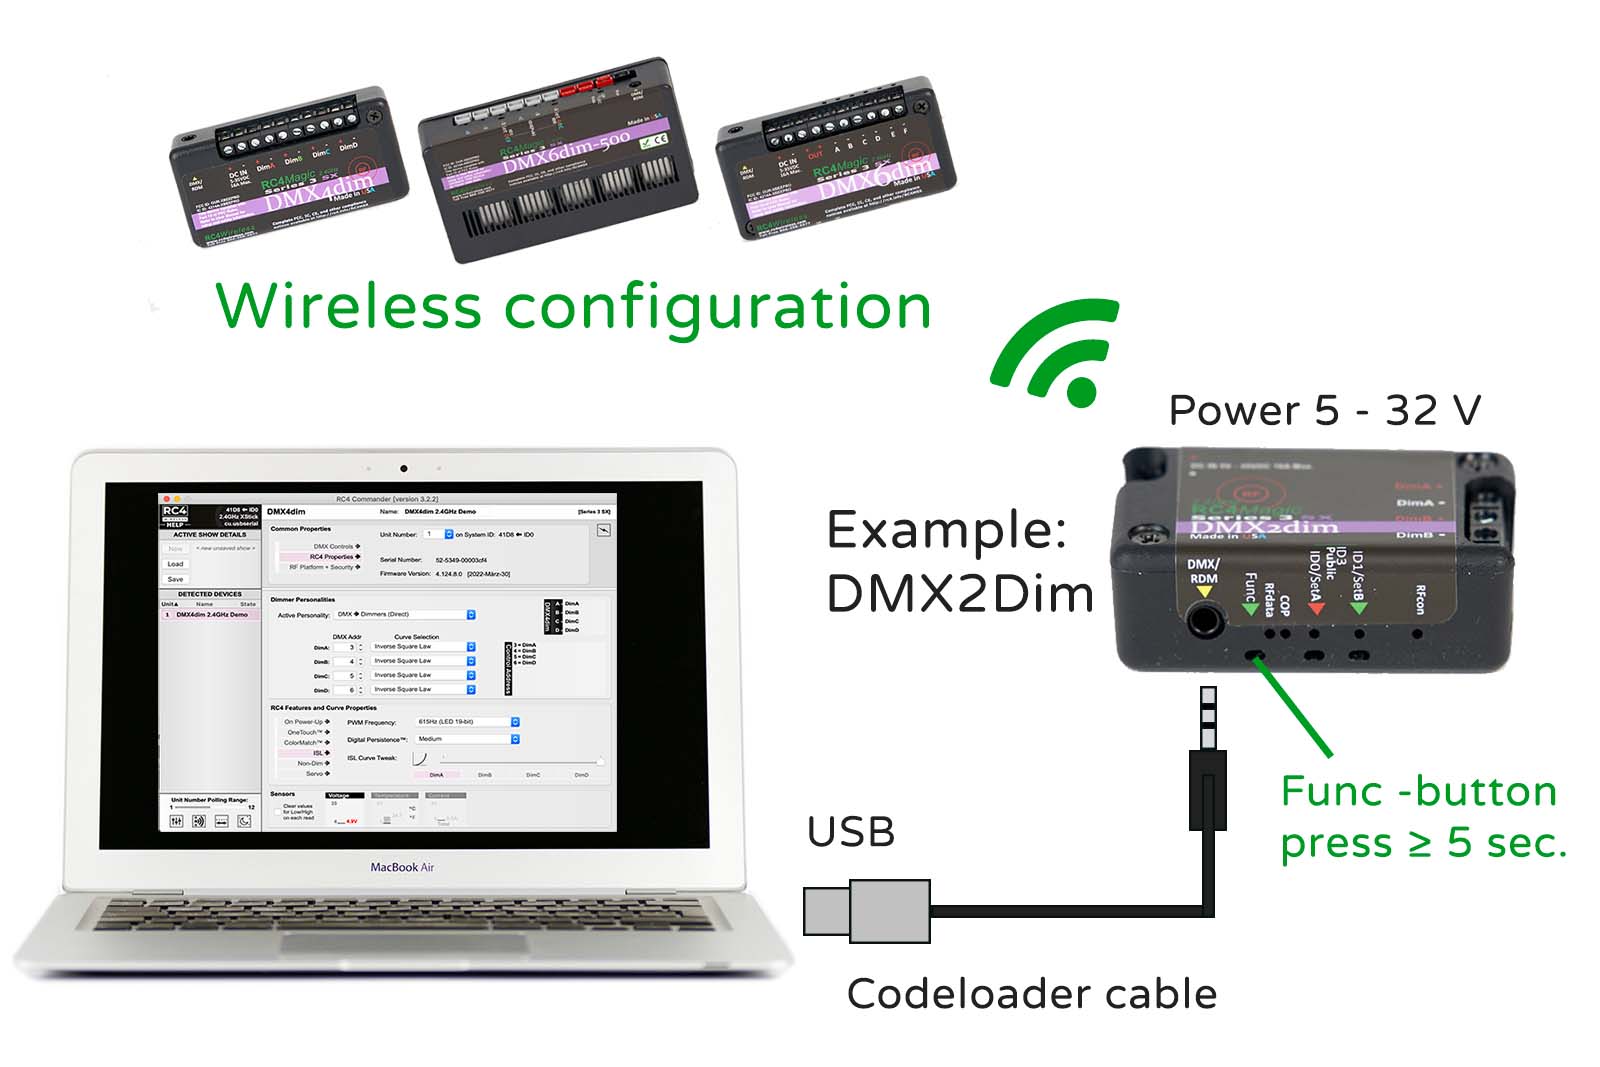
- Commander Software (wireless configuration of RC4 Magic dimmers)
Performing a Factory Reset :
If someone else has used your dimmer, or you just want to get back to a known configuration, performing a factory reset is easy:
- Power on the device. The green COP indicator will be blinking.
- Press and hold Func, briefly tap (press and release) the SetABC (for 6 channel dimmers) or SetA (for 2 and 4 channel dimmers) button, then release Func. Four indicators will blink to confirm that factory settings are restored.
NOTE: This does NOT affect transmitter linking.
PRO TIPS: Bending a single paper clip into a U shape will enable you to easily reach and press both buttons together. If you are not sure what mode or setting you may have selected, you can always get back to a known starting point by returning to factory defaults.
Default factory settings are:
- Normal device mode (DMX DimA/B/C/D)
- DimA/B/C/D set to DMX channels 1/2/3/4
- All dimmers set to ISL-Slow curve
- All dimmer PWM frequencies to 5 kHz
- All RC4 Digital Persistence times to Fast Medium
It´s very easy.
1. Power up LFX Master DMX.
2. Turn rotary switch “EFFECT” to position “DMX set-up”
3. Use black JOG to navigate to “basics” > “software version”
The latest firmware version is 2.01.7
Please drop as line. We will arrange it for you.
Tell us which products you prefer to purchase.
Idle current — the power draw for just the device electronics varies between 0.6W and 0.75W. We rate it in watts because of the wide input voltage range.
To quickly calculate idle current draw, divide 0.75 by the working voltage. The result is in milliamps:
0.75 W / 6V = 125mA
0.75 W/ 12V = 62.5mA
0.75 W / 24V = 31.25mA
The LFXHub is the most versatile flicker box.
It provides an input for optical and electrical sensors, even provides a lightning option for lighting effects of a thunderstorm, paparazzi shot , or single flashes of a photo camera.
The LFXHub flicker box is the most successful lighting effect generator.
It´s versatile functions are unique.
Yes, it´s autosensing the input mains voltage and frequency.
Simply plug it in, may be suing an adaptor and go ahead.
See specs.
6-32 VDC with included PSU or use a battery
Along with your order confirmation you will receive the bank details by e-mail.
Please transfer the amount to our bank account asap.
If you send us a transfer confirmation from your bank we could ship immediately.
In addition to LEDs, tungsten light or any other DC-unit, the RC4 dimmers can also easily control servos (from model making), e.g. animated props, via wireless DMX.
For all shipments we use DHL Express. Anyway you will receive a shipping confirmation by e-mail including tracking details.
Within Europe your order normally arrives the next day if payment is completed until 2 p.m..
If you prefer to use your own forwarding company please contact us before you place your order. We can arrange this.
Please find profound technical support about all RC4 Wireless products in the RC4 knowledge base.
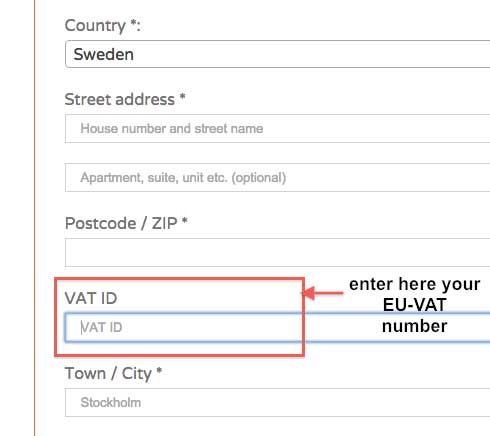
As a B2B company based in the European Union VAT is not charged if you provide your company´s valid EU VAT ID.
The field “VAT-ID” shows up as soon as you choose your EU- Country in the drop-down menu.
Please enter your European VAT ID during checkout in the tab “Billing address“.
If the validation was successful VAT will not be charged on the final check-out page.
LFXHub & accessories: 3 years
LFX Master series: 2 years
Important factors to consider are:
- The overall running time you need between battery charges
- The space you have available for everything to fit, and
- Sometimes the most difficult things — your budget constraints and timeframe to get everything up and running
First of all you need to check if there are any existing wireless networks.
The RC4Magic series is EOL, thus please do not use it for new projects.
Best Choice are the RC4 Lumenradio products.
Please get a overview of the different standards.
Please contact us for assistance.
The LFX Master DMX and LFXHub use high resolution flicker CURVES with sequential dimmed values.
All built-in effect engines of LED fixtures use random patterns of a variation of fixed values.
For that reason all “organic” effects like fire, candle, welding, lightning and TV take advantage of the pre-programmed flicker curves with 24 fps resolution which ensures a natural look.
Even the LFX Master dim uses the same quality of flicker curves as used in the LFXHub and LFX Master DMX.
This video shows how to wire RGBW LEDs to a 4 channel dimmer.


